
- All
- Product Name
- Product Keyword
- Product Model
- Product Summary
- Product Description
- Multi Field Search

Views: 4 Author: Site Editor Publish Time: 2026-10-10 Origin: Site


Computerized knitting machines turn digital pattern files into thousands of precise stitch decisions every minute, producing sweaters, collars, hats, shoe uppers, and whole-garment panels at high speed. That precision also makes them sensitive. A worn needle, a small knot in the yarn, or a corrupted pattern file can stop the carriage, spoil a panel, and interrupt production. Because downtime carries a real cost, operators must recognize the early symptoms of a fault and know which adjustment to make first.
Most computerized knitting machine problems fall into five categories: needle and needle bed faults, yarn feeding and tension faults, program and control system errors, mechanical and carriage faults, and fabric take-down problems. The large majority produce visible or audible warning signs before they cause serious damage, and most can be corrected through systematic inspection, correct settings, and routine maintenance rather than a full overhaul.
This guide examines each category in turn, traces symptoms back to their causes, and outlines the maintenance routine that prevents most faults from returning.
The faults reported most often are broken or worn needles, dropped stitches, uneven yarn tension, yarn feeder and sensor failures, pattern and software errors, carriage jamming, and fabric take-down defects. Needle related issues cause the largest share of unplanned downtime, followed closely by yarn feeding problems and control system errors.
The table below groups these families by symptom and by the component to inspect first.
Fault Category | Typical Symptoms | First Component to Check |
Needle and needle bed | Dropped stitches, holes, vertical lines, repeated breakage at one position | Needle condition and needle groove |
Yarn feeding and tension | Uneven fabric density, yarn breakage, loose loops | Tension device and yarn path |
Program and control | Wrong pattern, unexpected stop, blank screen, error code | Pattern file and error code list |
Mechanical and carriage | Jamming, grinding noise, sudden stop mid-row | Carriage path and needle bed debris |
Fabric take-down | Fabric curling, fabric caught in rollers | Take-down rollers and fabric path |
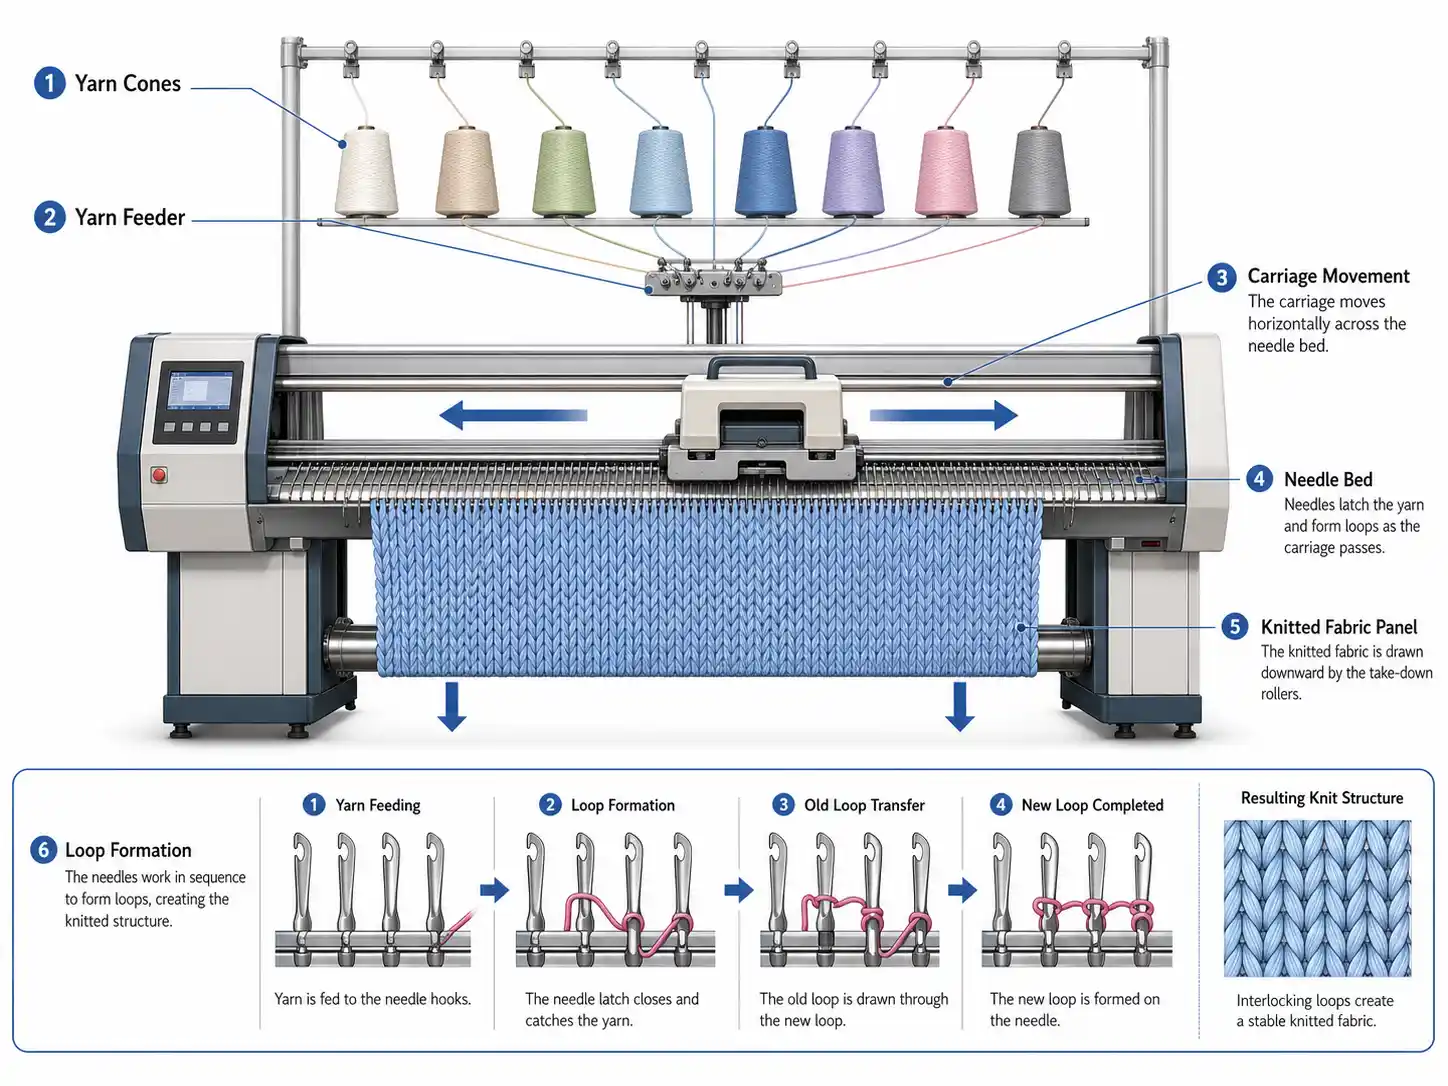
Every symptom traces back to one of five interacting systems: the control system that stores the pattern and issues commands, the knitting system of needles, cams, sinkers, and carriage, the yarn feeding system, the fabric take-down system, and the drive system. Faults rarely appear in isolation. A worn cam, for example, stresses needles and produces dropped stitches that look like a feeding problem. Understanding the general principles of how a knitting machine forms loops helps before narrowing down a specific fault.
Needle and needle bed problems are the largest single source of fabric defects in computerized knitting. Worn, bent, or broken needles, contaminated needle grooves, and misaligned needle beds cause dropped stitches, holes, vertical lines, and breakage that repeats in the same position until the underlying cause is found.
Needles endure constant friction against the needle bed, so they wear out first. The usual causes are production without lubrication or inspection, a needle gauge that does not match the yarn, excessive tension that pulls the hook forward, and lint or foreign objects trapped in the groove. The pattern of breakage is the most useful diagnostic clue.
Breakage Pattern | Most Likely Cause |
Random, across the whole needle bed | Insufficient lubrication or low-quality needles |
The same position, again and again | Damaged needle groove or worn cam |
Concentrated on one side | Uneven machine level or worn sinkers |
Only when a specific yarn is used | Yarn defects or incorrect tension |
Sudden, many needles at once | Foreign object in the knitting zone |
Replacing the damaged needle is only half the job. If a new needle breaks in the same position, stop the machine and inspect the groove, carriage movement, yarn path, and settings. A latch that sticks or fails to return produces the same defect even when the needle body is undamaged, so latches should be checked for free movement at every inspection.
A dropped stitch appears when a needle fails to hold or form the loop, leaving a hole or an incomplete pattern element. Because the cause can sit anywhere between the yarn cone and the needle hook, a fixed checking order saves time:
Stop the machine safely and note exactly where the defect appears.
Inspect the needle at that position and its latch.
Check the brush that opens the needle latch.
Examine the yarn feeder and the yarn path for obstructions.
Verify yarn tension and the position of the cones.
Check the sinkers and the related cam area.
Run a short test knit after making a single adjustment.
Change one setting at a time, because adjusting tension, stitch size, and speed together makes it impossible to know which change solved the problem.
Bowing and skewing make a design curve or slant across the panel instead of running straight. The usual causes are an unevenly adjusted take-down mechanism and poor needle or sinker alignment. Calibrating the take-down so tension is consistent across the full fabric width corrects most cases, and the underlying geometry of flat-bed knitting explains why transverse tension shapes the stitch so directly. Where the defect persists, worn sinkers or needles sitting too tightly in their slots should be replaced or realigned.

Yarn feeding and tension faults are the leading cause of uneven fabric density, yarn breakage, and inconsistent stitch size. They typically originate in misadjusted tension devices, worn guides, lint buildup, or yarn that is unsuitable for the machine and the pattern.
Yarn tension affects every stitch, so even a small deviation shows up across the whole panel. Reliable feeding depends on tension devices set for the specific yarn, smooth and aligned ceramic guides, cones that unwind without snagging, and yarn free of knots and slubs. Excessive tension pulls the needle hook forward and stresses the knitting zone, while tension that is too low prevents a stable loop from forming. Small adjustments followed by a test knit are far more reliable than large corrective changes.
The yarn feeder must deliver yarn at a constant rate and stop when it should. An electromagnet that does not slide freely prevents the feeder switch from returning to position, causing intermittent feeding, while a feeder covered in lint blocks the yarn path and starves the needles. Cleaning with a soft brush or compressed air, plus lubrication, prevents both. Yarn control units also carry a knot sensor and tension arm sensors, and when the tension arm rises because the yarn has broken or run out, the sensor stops the carriage immediately.
Program and control system errors range from corrupted pattern files to blank displays and incorrect error handling. Most are resolved by verifying the pattern data, checking connections, and restarting the machine, and nearly all can be prevented with software updates, stable power, and consistent operator practice.
A pattern that is incomplete, saved from an incompatible software version, or damaged during a USB transfer can produce wrong stitch selection, unexpected stops, or a machine that refuses to run. Confirm that the file is complete and compatible with the machine software, reload it from a known-good source, install manufacturer-recommended updates, and keep backups of proven patterns. A power-off memory function also lets the machine resume from the point where power was lost, which prevents wasted panels.
Control panels report the location of a fault through a numbered code and an indicator light, covering the doors, the needle bed, the brush area, the knot sensor, and the tension arms. When several sensors trigger at once, the panel asks the operator to clear all of them, which means every sensor should be inspected rather than only the first one displayed.
Error Type | Location | Common Cause |
Door error | Front, rear, or side panels | A door not fully closed after inspection |
Shock error | Needle bed | A broken needle or debris present |
Clump error | Brushes on the carriage | Lint or yarn accumulated on the brush |
Knot error | Knot sensor on the yarn control unit | A real knot passing through the sensor |
Yarn top or side error | Tension arm on the control unit | Broken yarn, exhausted cone, or wrong settings |
A blank screen is a separate problem, usually caused by loose display connections, a damaged display unit, or an unstable power supply. Securing the cables, restarting the machine, and checking the power supply resolves most cases.
Sensors fail through contamination, drift, and unstable power. Optical sensors lose accuracy when lint and oil build up on the lens, so cleaning and recalibration belong on the maintenance schedule. Frayed cables, loose connectors, and voltage fluctuations also produce intermittent faults that are hard to reproduce, and a voltage stabilizer plus regular wiring inspections prevents most of them.

Mechanical faults announce themselves through noise and resistance. A carriage that jams, grinds, or suddenly stops is usually responding to debris in the needle bed, a damaged needle, or incorrect settings, and forcing it through the obstruction will cause further needle and machine damage.
A grinding sound or unexpected resistance should always be treated as a stop signal. The usual causes are damaged needles below the carriage, debris and stray yarn in the needle bed or on the rails, and worn carriage components. Stop the machine, clear anything obstructing the carriage path, replace any damaged needles, and test movement by hand before restarting. Never force the carriage through an area of resistance, because the pressure that clears the obstruction may also bend the surrounding needles.
The take-down system keeps fabric moving away from the knitting zone at even tension. When fabric becomes caught in the rollers, the machine may keep knitting while the fabric stops advancing, which damages stitches and distorts the panel. Stop the machine, release any stitches still on the needle bed, and free the fabric gradually rather than pulling it out in one movement. Where fabric repeatedly curls or catches, recalibrate the take-down tension and check the guide path for anything that snags it.
A structured sequence is far more effective than random adjustment. Stop the machine, identify exactly where the fault appears, check the components in order from the defect outward, change one setting at a time, and run a short test knit before returning to full production.
The following order works for most faults:
Stop the machine safely and mark the position of the defect.
Read any error code and check the corresponding sensor or location.
Inspect the needle and its latch at the affected position.
Check the brush that opens the latch.
Examine the sinkers and the related cam area.
Trace the yarn path from the cone through the guides and feeder.
Verify yarn tension and the position of the yarn packages.
Review settings such as stitch size, speed, and take-down, then run a test knit.
Record the fault and the fix so the next occurrence is faster to solve.
Preventive maintenance is the most cost-effective way to reduce computerized knitting machine faults. A scheduled routine covering cleaning, lubrication, inspection, and calibration prevents the great majority of needle, feeding, and control problems before they cause a stoppage.
Interval | Maintenance Tasks |
Daily | Inspect needles and the knitting zone, clean the work area, verify basic functions before production |
Weekly | Clean the needle bed and carriage path, lubricate designated points, inspect guides and tension devices |
Monthly | Run system diagnostics, calibrate sensors, inspect wear components such as sinkers and cams |
Annually | Professional inspection, replacement of consumable components, software updates |
Operator training supports the whole schedule. Trained operators recognize abnormal sounds, spot fabric irregularities, understand error messages, and record faults accurately. Early detection is what turns a minor adjustment into a scheduled task instead of an emergency stoppage.
Repair is usually the right choice when the machine is young and the fault is limited to replaceable components. Upgrading becomes the better decision when faults disrupt production frequently or when maintenance costs approach the cost of new equipment.
Repair is generally preferable when the machine is under five years old, the fault is isolated to a replaceable part such as a needle, sinker, or sensor, the repair cost is well below the cost of replacement, and spare parts remain available. An upgrade deserves consideration when repairs regularly disrupt the production schedule, annual maintenance costs approach a significant share of new machine payments, or existing technology limits new product development.
Factor | Repair Existing Machine | Upgrade to New Machine |
Immediate cost | Lower upfront expense | Higher initial investment |
Downtime | Depends on parts availability | Planned and scheduled |
Capability | Limited to existing features | Access to current technology |
Long-term reliability | Declines as components age | Restored by new components |

Daily cleaning and inspection should be carried out before every production run, with more thorough cleaning and lubrication weekly and a full diagnostic check monthly. A professional inspection once a year, including replacement of consumable parts and a software update, keeps the machine within specification.
Minor needle bed issues, such as debris in the grooves or a single damaged slot, can usually be corrected by cleaning and careful realignment. Widespread groove wear or a bent bed affects needle alignment across the whole knitting width and normally requires professional repair or replacement, since an uneven bed will keep breaking needles even when every needle is new.
An interruption in power can clear the machine's active memory, which stops the program and leaves the current panel incomplete. Machines with a power-off memory function resume from the exact stopping point once power is restored, so the fabric can be completed instead of discarded. Without that function, the pattern must be reloaded and the stitch count verified before continuing.